Top of the Mountains

Top of the Mountains

Monday, May 20, 2013

This is how it all starts

Rough in Pencil stage


With every painting it all has to start somewhere.  But even before I get to the point of drawing on the canvas.  Many hours of work have already been invested in the painting.

 I've got to decide first on what I want to paint

    With this painting I knew it was going to be a Wildlife painting.  I've been wanting to paint another Elk too.  So I started thinking about Elk and their environments.  I watch videos on YouTube of Elk in the wild.  I also knew that this painting will be put up for Auction in Price Utah, so some place in Utah.  When I would talk to people about this painting, I would tell them about the Elk then I kept saying it will be in the Uintas somewhere.  So it is going to be an Elk in the Uintas.  Also after talking with a guy I work with at the Provo Temple.  I told Him I wanted some type of fury small animal hidden in the rocks up front in the lower right corner.  We tossed ideas around of various animals, weasel, ferret, wolverine, marmot, wood chuck and so on.  Then he came up with the idea of a wolf.  I suggested not up front being too large an animal there, but in the back ground, hidden in the trees.  So now I've got an Elk and a Wolf.  Having the Wolf will add a bit of tension and excitement to my painting's Narrative.  But I still need a small animal in front.  So after pondering about it, I came up with a Female Grouse and a nest of eggs.

Research Time

    Now that I know who, what and where it is time to do research into those areas. 
  •  Knowledge about the subject: history, location, structure, anatomy and so on
        I started by doing more research on Elk, Wolves and Grouse.  Also I did research into the habitat of these various animals and the Uintas.
  •  Plein Air
        I went out a couple of times to do some plein air paintings for this painting.  The first day I got chased away by a lightning storm ( I didn't want to get struck by lightning in the middle of an empty meadow).  Then on a second day I just couldn't find a place that had what I was needing.  So I'll just use some of my old plein air paintings as reference.
  •  Reference photos, both on site and internet
        While out getting chased by lightning I took plenty of pictures.  Also I spent a few hours on Google doing image searches.  These I just use as rough references.  I don't copy any of them.
  •  Early sketches
        Once I know roughly what I want, I start doing sketches to work out many of the problems of size and arrangement of the various elements of the painting.

The are sketches from an earlier post
Couple of oil studies of Elk with different painting techniques

  • What size
    Well I knew I want to go bigger then what I usually go with, because this was going to help this sick little boy.  Bigger is better.  After spending time looking at canvas of various sizes I first decided on the standard size of 22 inches high by 28 inches wide.  But as I thought about it maybe bigger was better.  So now I'm going with 30 by 40 inches.
  • What am I going to paint it on
    At first I wanted to painting this on a board.  Either canvas board or Hard board with 4 - 5 coats of Acrylic Gesso.  But I didn't have anything of the sizes I was looking to paint on laying around the studio.  So I went out to see what various art and craft stores in the area had in stock.  But no had what I was looking for in boards.  So I went with a canvas instead.  Plus a canvas at that size (30 x 40) will be much lighter.
  • Time of day
    Evening, magic hour.  A time of warm light and cool long shadows.
  • Direction of the lighting
    Right to left with the sun way off of the canvas to the right.
  • What will be the narrative of the painting
    I'm still not completely sure of this.  But it is taking on a life of it's own as I place the various animals and elements in the painting.  For me personally the Elk represents a feeling of grandeur and noble strength.  The Wolf hiding in the shadows of the trees, darkness and ill intent.  The Mother Grouse sitting on her eggs, innocents and motherly protection.
  • What over all feeling am I looking for
    I'm just going to see where this one takes me.
  • What two main colors will be represented in the painting
    Yellow-Orange / Violet.

Meditation / letting all this information just sit and Stew

Hours spent just sitting and/or laying on my back thinking about and visualizing all the various elements of the painting.  This is the goal setting part of the painting.  If I don't know where I'm going how will I get there or know when I've arrived.

Once all this is done and I've rough the painting in I'm finally onto the next stage, Inking.

Thursday, May 16, 2013

Add more vitality to your collection

These are the techniques I used to enhance the print, "The Field is White".

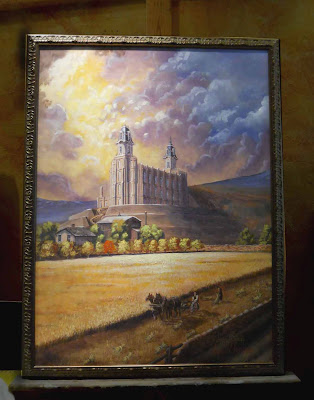
30 X 40 Giclee Print with frame


Many of us have in our homes pieces of art to add beauty and vitality to our lives.  For what ever reason you have art in your home, very few of us have original art work on display.  Most of us have various types of prints.  From the high end Giclee Canvas to the low end paper poster.  There are various ways to enhance these prints that artist have used to increase their value and beauty. 

   One is for these artist who created the original piece of art to take a Giclee Canvas print and to paint directly on it.  This does several things.  First it makes the print unique.  No two brush strokes are the same.  I have tried to paint two paintings identical side by side at the same time trying to match stroke for stroke.  As each brush stroke is put down they each are different.  Thus making the painted on Giclee unique.  Plus it is something the artist has taken his time to like the original put something of him or herself into.  Thus adding to the vitality of the piece.

  Another way to add uniqueness to a print is for the artist to sign the print with his hand written signature.  Also to increase the value of this process is for the artist to limit the number of prints he will do this, thus making it a signed and numbered print.  Back when all printing was done on what is called offset printing.  Metal plates were used for the ink to stick to.  As these plates were used, over time the plates would wear out.  So the first prints were sharp and cleanly focused.  But as
hundreds and even thousands of prints were made the image would become blury and dull.  So the earlier prints were worth more and so they had a lower number. 

Today many prints are digital Giclee printed on canvas or archival paper.  So the first one is just as good as the ten thousandth one.  So to add value for the collector of these prints, artist will still run limited batches and sign them from one to five hundred or so, sometimes more or sometimes less.  Plus it is interesting to note that over time the artists signature will get worn out and muddy as the number of prints go up.  If you think I'm being silly, just sit down and sign your name five hundred times at once then compare how signature number one looks compared to signature number five hundred.  I once had an artist friend of mine tell me that his publisher had him sign ten thousand prints all at once.  His publisher placed him in a small windowless room for eight hours a day for a week.

Another technique to add a unique feel to a print is to use a product called, Gloss Gel Medium from Liquitex.  The product looks like white glue and has the feel of whipped cream.  Anyone can use this easy to apply product.  You don't need to be the artist to do this.  To use this product, just apply it with a brush.  I like painting with Flat brushes so I used a medium size brush, about one inch.  Now despite how the product looks it dries clear and glossy.  But unlike other varnishes this product keeps the brush strokes you use as you paint it onto the print.  So when dry your print will look like a hand painted still wet painting.  So when applying this Gel product it is important to think about the kinds of brush strokes you will be using.  I recommend using the painted "X" brushstroke.  You literally apply it like you are just painting lots of little over lapping "X-es".  Once this is done, you can if you like go back in and use some enhanced brush strokes.  This is done by pushing the brush more firmly onto the print and then as you make the stroke you pull gradually away.  This gives the illusion of large heavy brushstrokes of paint.  Plus as the light moves across the print, these heavier brushstrokes will stand out more and so attract the eye of the viewpoint to them. 

Hopefully now as you look around your home you will start seeing the possibilities with this product to improve to look of your print and poster collection.

Thursday, May 9, 2013

It all starts somewhere

Sunday I was contacted through email by a gentleman named Roger, wanting me to donate a print of my painting, "Heaven and Earth" for a charity auction.  The Auction is for a little boy, who is 3 years old, lives in Price, Utah, and has been diagnosed with Acute Limphoblastic Leukemea-ALL. He will be undergoing numerous procedures to battle this disease such as spinal taps to inject Chemo into his spinal fluid, blood transfusion, etc. over the next 3 years.

It all sounded legitimate but these days I'm a little leery about being asked to donate art from close encounters with some scams.  So I asked for more information into who he is and what is his affiliation to the family putting on the auction.  He asked if we could talk on the phone and I decided that would be easiest for me too. 

Before he called I did research into the boy.  I Found the auction event and a blog right away.  I read it all and found it to be very legitimate.  So when Roger called I was ready.  He told me how he and his family met the Timothy family, through softball and staying in each others homes.  He told me a little about his background.  Then told me how he found out about my art through the Brimley Studios website and that he and his daughter just enjoyed the "Heaven and Earth" painting. 

I told him that after discussing the issue with my wife that I decided not to give a print to the auction but to instead paint an original Wildlife painting and give the original away to be auctioned off.  Needless to say he was very excited.  I also told him that anyone who buys a print of that painting, I'll give 50% of the proceeds to the family up to a year after the event.  This made him greatly touched. 

Roger currently works for a framing company so I don't need to worry about a frame.  Which I'm excited about.  I'm always looking for contacts with good framers.

So I've been spending the last couple of days working out an idea of what to paint, the size and what to paint it on.  I think I'm going to go bigger than my standard size.  I'm thinking around 24 x 30 inches.  A good chunky size.  With a frame it will be a nice auction piece.  I'm going to paint it on canvas board.  As to the subject, an Elk.  I've been wanting lately to do a painting of an Elk bugling.  So now I'm off and sketching.  Working on various ideas.   Whether I include a few cows or keep him solitary is yet to be determined by the overall balance and feel I'm looking for.


Early sketches of elk painting

Over the next month or so I'll be blogging about the progress of this painting, the auction and the reception of it.  So I guess I'm inviting you all to come along with me through this blog and see what it is like to be an artist as I work on this project.

Monday, May 6, 2013

Spring Lake Smiling Barn

    I enjoyed painting the Saunder's old barn so much that I decided to go and paint it again.  On Saturday, late in the morning I headed out.  This time I set up across the road to the west in the grass next to the fence.  It was a clear sunny, warm spring day.  After I had just started working.  I heard someone ride up slowly on what sounded like a four-wheeler.  I had my back to the road so I couldn't see who it was.  I had just drawn in the large shapes in Indian Yellow, when they approached.  It was the older brother of the guy I talk to the last time I was out there painting.  He had one of his young daughters with him.  After asking me how much, he basically bought it there on the spot, without having not seen it completed.  He told me to bring it by his house when I was finished with it.  Which is what I did.  He loved it.  He told me that the barn is called by the locals, the "Smiling Barn".  Which you can see in the painting of the barn.  In fact when I was working on the painting.  I got to the part of painting where a long board sticks out just under the windows.  I thought to myself that it looked like the barn was smiling at me. 

    While I was out painting the Jersey Cows on the other side of the fence, a little ways off decided to nonchalantly come over and check me out and what I was doing.  Then once they had all gathered on some unknown signal to me they all at once stopped eating and just stared at me.  Just as quickly as they came they moved on.  Soon the horses decided that the cows were up to something and they didn't want to be left out.  Also casually made their way over.  Once again stared and then moved on.  While the cows were there I got out my camera and took some picture of them. So I could put them in the painting later back at the studio, which as you can see I've done.  Now that it is scanned I'll take it back to the new owners of it.

    One of the things I learned from this plein air painting trip was that I need more business cards and brochures.  So that people who stop by can instantly see my work.  I've also created a QR symbol that will be going on all my printed stuff too.  I had several people stop and look from their cars.  One lady stopped by and talked with me for a bit about what I was painting.  Which I enjoyed. 

12 x 16 oil on board "Spring Lake Smiling Barn"

Tuesday, April 30, 2013

Crayons, Not just for kids

I've been invited by my local Ward to show the young women how art can be used to add beauty to their homes.  I didn't want to break out the oil paints and give them a demonstration because of the smells of the chemicals and the mess.  Plus this is to be something simple that they can do easily.  So I decided that the best thing to do is to show them how tools that most people may have laying around the house can be used to make art.  I choose Construction Paper and Crayons.  I bought these below at my local grocery story.

Construction Paper and Crayons
I also decided that a demonstration finished piece should be make so they could see the potential of these simple items.  Now I've never really worked in this medium.  Well not since I was three or so.  I did some basic research last night on Google for a half an hour, to see how other artist had worked with crayons and to pick up some pointers.  Then today I when out and bought my supplies and got to work.

8 x 10 Crayola Crayon on Paper
I had a lot of fun.  I felt like I was a kid again.  I used a picture I had on my computer of a still life, as reference.  I didn't use anything except the Crayola Crayons and a pencil to rough in the objects.  It is amazing to me how many of the principle I use in oil painting applied straight across to this drawing.  One of the things I learned early on is that you can easily go dark, but going light was very difficult if not impossible once the heavy darker colors were put in.  I could use white to lighten up hews a little bit on the stronger colors. 

I'm looking forward to doing this again tomorrow with the young women.  I think for the young woman I'll bring a flower in a glass bottle for them to look at and draw.  I'll try and take picture of their art and post them tomorrow. 


Monday, April 29, 2013

A Mistake!! What's the World Coming to?

16 X 20 oil on board "The Forbidden Fruit"
Every so often I get asked what do I do when I make a mistake.  I have to chuckle a bit with that.  Because for me my paintings are just numerous assorted layers of mistakes.  Through hard work, lots of patience and wisdom.  I have learned what to continue to work on and what to leave alone with each painting. Over time it becomes a beautiful painting. It is a process of learning and growing.  Mistakes are just evidence of refining work being done.  Over the years I've developed a process of using mistakes to get better at painting.

To use the mistake process you must first know what it is you are trying to do.  Saying that you want to create a beautiful picture isn't enough.  This is a type of goal and the more specific you can get the easier it will be to learn, grow and get better. 

So for example I'm working on Plein Air paintings.  My current goal is I want to paint paintings that are warm and friendly, eye catching, strong tonal and temperature contrasts and simple brush work with an easily defined focal point.

Every time I sit down and paint I'm going over these goals in my head.  I'm making choices based on them.  Also I've learned that once you put down a stroke don't go back and fiddle with too much.  Be confident in your brushstrokes.  If you fiddle with the brushstrokes too much you'll just end up with a muddy over worked tired looking painting. 

Once the painting is done enough, it's time to compare it to your goals.  This is where I perform a kind of autopsy on my painting.  The key to this part is asking questions.  Your brain will in time find the answers.  So start asking.  Why did or didn't it work?  What could I do next time?  What goals did I get close to and why?  What artist that I like are able to achieve the goals I've set successfully? What is the difference between their painting and mine? Then sit back and ponder.  This is just giving you brain time to find the answers.

Once you get an answer then you may want to further refine your goals or go and do another painting, repeating the whole precess again. 

Saturday, April 27, 2013

Focal points and Goals

12 X 16 oil on board "Old Saunders Barn"
I read an older and well read article in the 2007 issue of American Artist magazine, titled "Attracting the Viewer's Eye With Skillful Simplicity" by Linda S. Price, about an artist by the name of Doug Higgins and his Plein Air paintings.  I have read this article many times, however this time, my attention was drawn to one thing in particular that he said about one of his objectives of Plein Air paintings.  He said, "[m]y goal is simplicity.  Complexity is easy - anyone can achieve that through thoughtless copying of details.  You need intelligent strategies to keep it simple."  In my case, I think he is right.  I've been somewhat thoughtlessly jumping into Plein Air paintings, assuming that my many years of painting would bring it all together, but they haven't. 
My old mentor, Greg Olsen, was right when he said that until you do something, you won't know what real questions to ask or know what it is that you really want.  I've painted several Plein Air paintings and I'm just now beginning to understand what it is that I really want from them.  Up until now, I've been going out and just, "thoughtless[ly] copying".  Even in my most recent experience, I jumped in and started noodling to early (to noodle is to use a liner brush to make small excessive details). 
I have learned that I need to take a little more time before I start, think about what I want my main focus to be and lay as much of the painting out in my mind as possible.  In essence, I am presetting my goals for the painting, even before I apply the first stroke of color.  Then, as the painting progresses, not losing sight of my original goal.  With that in mind, I hope to take a little time to determine my end goal for the painting and work to hold to it.  My plan is to do another painting of this same farm, from a different angle.  I would like to express my thanks to the owners of the property who have generously allowed me access in my endeavors.